 中文简体
中文简体 English
 русский
Don't hesitate to send a message
I. Introduction: Solving the "Impossible" Task The phrase "fitting a square peg into a round hole" is a universal symbol...
READ MOREContent
The phrase "fitting a square peg into a round hole" is a universal symbol of incompatibility. Yet, in the world of woodworking, drilling a perfect square hole is not only possible but a fundamental technique for creating strong, beautiful joints.
How is this achieved? The secret lies in a specialized and ingenious tool: the Square Hole Drill Bit. This tool defies conventional drilling logic, offering a clean and efficient solution for woodworkers. This guide will unravel the mystery behind these bits and explore the various tools of the trade, empowering you to master the art of square hole cutting for your projects.
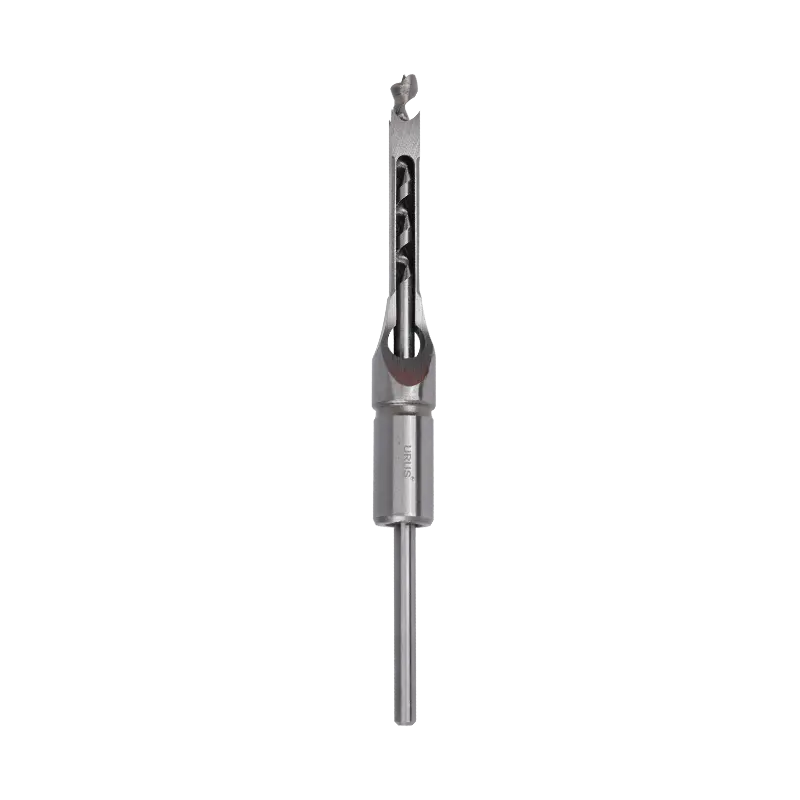
At first glance, the idea of a drill bit creating a square hole seems to defy geometry and physics. A standard drill bit rotates symmetrically, naturally creating a circular bore. So, how can a rotating tool produce sharp, internal corners? The answer is both clever and elegant: a Square Hole Drill Bit doesn't actually drill the square hole by itself. It is, in fact, a sophisticated two-part system that combines drilling and chiseling actions in perfect harmony.
The entire process hinges on a precise partnership between two key components working in tandem:
To truly appreciate the distinct roles of these components, the following table provides a detailed parameter comparison:
| Parameter | Auger Bit (The Driller) | Mortising Chisel (The Chiseler) |
|---|---|---|
| Primary Function | To remove the bulk of the material by drilling a pilot hole. | To define the final square shape by shearing the corners. |
| Type of Motion | Continuous, high-speed rotation. | Linear, reciprocating up-and-down motion (or stationary with feed). |
| Material Removal | Efficiently bores and ejects the central core of wood. | Chisels and severs the fibers at the perimeter, creating a clean edge. |
| Impact on Final Shape | Creates the circular pre-hole and determines the depth. | Solely responsible for creating the sharp, square profile. |
| Key Physical Feature | Spiral flutes for cutting and waste removal. | Hollow, square steel body with four ground, sharpened edges. |
| Dependency | Can operate alone to create a round hole. | Cannot function without the auger bit to first clear the central waste. |
This synergistic process is what makes square hole cutting with these bits so effective. The system brilliantly overcomes the geometric challenge by separating the tasks of bulk material removal and profile shaping. The rotating auger handles the fast drilling, while the pounding chisel handles the precision squaring, resulting in a clean, accurate, and repeatable square hole that would be incredibly difficult to achieve by any other hand-powered means. Understanding this core mechanism is crucial to selecting the right equipment and achieving perfect results in your work.
Now that you understand the ingenious core mechanism of the square hole drill bit system, the next logical question is: what tool do you use to drive it? You cannot simply chuck a square hole drill bit into a standard handheld power drill. The process requires a specific setup that can provide both the high-speed rotation for the auger bit and the simultaneous, forceful linear travel for the mortising chisel. Fortunately, there are three primary pathways to achieve this, each catering to different levels of commitment, workshop setups, and project requirements.
The choice between these paths fundamentally balances four key factors: cost, dedicated functionality, precision, and workflow efficiency. Understanding the trade-offs will help you select the perfect solution for your workshop.
Description:
A mortising attachment is a clever accessory designed to convert a standard drill press into a dedicated square hole drilling machine. It is a self-contained unit that typically consists of a mounting bracket, a horizontal holding mechanism (often a fence), and a crucial component: the "chisel holder," which is locked in place and does not rotate. When mounted onto the drill press's quill and table, this attachment holds the mortising chisel stationary while the drill press's chuck rotates the internal auger bit.
Best Suited For:
This pathway is ideal for hobbyists, DIY enthusiasts, and small workshops that already own a capable drill press. It is the most cost-effective entry point into square hole drilling, as it leverages an existing major tool.
Advantages and Disadvantages:
Description:
A mortise machine, also known as a hollow chisel mortiser, is a tool built for one primary purpose: to drill square holes with maximum efficiency, power, and precision. This is a self-contained, standalone machine featuring a dedicated motor, a heavy-duty headstock that houses both the rotating mechanism and the chisel holder, and a robust table with clamps and fences.
Best Suited For:
This is the professional's choice, designed for production workshops, serious woodworkers, and anyone who needs to create a high volume of consistent, clean mortises. It is the ultimate tool for executing traditional joinery like mortise and tenon joints.
Advantages and Disadvantages:
Description:
It's important to distinguish this as a different type of tool altogether. A square hole saw is not a square hole drill bit system. It is a single, flat blade shaped like a square, with cutting teeth on its periphery. It functions much like a standard hole saw (e.g., for cutting holes for pipes) but in a square profile. It is typically used with a standard handheld drill or a drill press, and it works by grinding and abrading its way through the material.
Best Suited For:
This tool is best for specific, often non-structural applications. Think of creating square openings in thin sheet materials, plywood, drywall, or for tasks like installing electrical outlet boxes. It is generally not suitable for creating deep, clean mortises for traditional wood joinery.
Advantages and Disadvantages:
The following table provides a clear, side-by-side comparison of these three pathways to help you make an informed decision:
| Parameter | Mortising Attachment | Mortise Machine | Square Hole Saw |
|---|---|---|---|
| Core Mechanism | Converts a drill press to use a square hole drill bit system (auger + chisel). | Dedicated machine for the square hole drill bit system (auger + chisel). | A toothed, square-shaped saw blade used with a standard drill. |
| Ideal User | Hobbyists, DIYers, small workshops. | Professional woodworkers, production shops. | DIYers, electricians, for rough openings in thin materials. |
| Primary Cost | Low (Accessory cost). | High (Machine investment). | Very Low. |
| Setup & Workflow | Requires installation and alignment; can be cumbersome. | Permanent, instant setup; optimized for fast, repeatable workflow. | Instant setup; simple but can be difficult to control. |
| Output Quality | Good to Very Good, depends on drill press and setup. | Excellent. Produces clean, precise, and repeatable square holes. | Poor to Fair. Often results in rough, torn edges. |
| Suitable for Joinery? | Yes, well-suited for most joinery projects. | Yes, the ideal choice for high-quality joinery. | No, not recommended for structural or visible joinery. |
| Key Limitation | Limited by the host drill press's capacity; setup time. | Cost and dedicated floor space. | Poor cut quality and limited application depth. |
Mastering the theory behind the tools is only half the battle. Achieving clean, precise, and safe square holes requires a disciplined approach to technique and operation. Square hole cutting is a more demanding process than standard drilling, as it involves significant force and simultaneous shearing action. Adhering to the following best practices will not only improve the quality of your work but also extend the life of your tools and ensure your safety in the workshop.
The cornerstone of success lies in a symbiotic relationship between the tool, the material, and the operator. Neglecting any one of these aspects can lead to poor results, from torn-out grain and burned wood to broken chisels.
Proper setup is non-negotiable. A misaligned system will bind, overheat, and produce ragged holes.
How you feed the tool into the wood is critical.
Not all wood behaves the same way.
The following table contrasts correct practices with common errors and their consequences:
| Parameter / Action | Correct Practice & Rationale | Common Error & Consequence |
|---|---|---|
| Tool Setup | Ensure a small, uniform gap between the rotating auger and the stationary chisel. Rationale: Prevents friction, binding, and overheating, allowing for a smooth cut. | Forcing the chisel onto the bit with no clearance. Consequence: Causes immediate binding, overheats the bit, stalls the machine, and can weld the bit to the chisel. |
| Machine Speed (RPM) | Use a slow to medium speed (consult your machine's manual for a starting point). Rationale: Provides high torque for the shearing action and allows time for waste clearance. | Using very high RPMs, as for standard drilling. Consequence: Burns the wood, dulls the bit prematurely, and produces a rough, torn finish. |
| Feed Rate & Pressure | Apply firm, steady, and controlled pressure. Listen to the motor and feel the resistance. Rationale: Allows the chisel to cleanly sever fibers without deflecting or jamming. | 1.) Forcing the cut too aggressively. 2.) Feeding too timidly. Consequence 1: Tool breakage, motor stall, poor finish, safety risk. Consequence 2: The bit rubs and burns the wood instead of cutting it. |
| Workholding | Securely clamp the workpiece to both the table and against the fence. Rationale: Counters the significant lateral shearing force of the chisel. | Holding the workpiece by hand. Consequence: The workpiece can lift and spin, ruining the mortise and creating a severe safety hazard for the operator. |
| Bit Sharpness | Maintain razor-sharp edges on both the auger's spurs and the chisel's corners. Rationale: Sharp tools cut cleanly, require less force, and generate less heat. | Working with dull tools. Consequence: Requires excessive force, tears wood fibers, produces a crushed and rough surface, and drastically increases the risk of kickback and tool breakage. |
The journey into the world of square hole cutting reveals a fascinating intersection of clever tool design and practical woodworking technique. We have demystified the process, moving from the "how" of the ingenious square hole drill bit system to the "with what" of the various available tooling paths. The central takeaway is that drilling a perfect square hole is not only possible but is a manageable task once you are equipped with the correct knowledge and the appropriate tool for your specific needs. The decision now rests on aligning these tools with the scope, scale, and demands of your own projects.
Making the final choice is a matter of conducting an honest assessment of your workshop's requirements. This involves weighing factors such as your budget, the frequency of use, the required precision, and the available space. There is no single "best" tool for everyone; rather, there is a best tool for your situation. The following comparative summary is designed to serve as your final guide, consolidating the key attributes of each pathway to aid in your decision-making process.
The following table provides a consolidated, at-a-glance comparison to help you finalize your choice:
| Decision Factor | Mortising Attachment | Mortise Machine | Square Hole Saw |
|---|---|---|---|
| Primary Driver | Cost-Effectiveness & Space Efficiency. Leverages an existing drill press for occasional, hobbyist-level work. | Performance, Precision & Workflow Efficiency. Justified by frequent, professional use and the demand for flawless joinery. | Immediate Accessibility & Low Cost. For non-critical, rough-opening tasks in thin materials where finish quality is irrelevant. |
| Ideal Project Scope | Occasional furniture projects, DIY repairs, custom boxes with mortise and tenon joints. | High-volume production, commissioned furniture, traditional joinery, and any project requiring repeated, perfect mortises. | Installing electrical boxes in wood, creating vents, or cutting openings in thin plywood or panels for non-structural purposes. |
| Investment (Cost & Space) | Low initial cost for the attachment. No additional floor space required. | High initial investment. Requires permanent and dedicated workshop space. | Very low initial cost. Highly portable and requires virtually no dedicated space. |
| Workflow Integration | Requires setup and teardown, integrating into a multi-purpose drill press workflow. This can slow down production. | The workflow is the machine. It is always ready, enabling fast, repetitive operations that seamlessly integrate into a production line. | A simple, on-demand tool pulled out for a specific, one-off task. It does not integrate into a joinery workflow. |
| Ultimate Limitation | Its capacity and precision are capped by the quality and power of the host drill press. It is a compromise solution. | Its specialization and cost can be difficult to justify for a woodworker with limited space or budget who only occasionally needs it. | Wholly unsuitable for precision woodworking joinery. It is a rough-cutting tool, not a fine woodworking instrument. |
In summary, the path to mastering the square hole is clear. Let your project needs, frequency of use, and commitment to quality be your guide. Whether you choose the adaptable attachment, the dedicated powerhouse, or keep the simple saw on hand for odd jobs, you are now equipped with the knowledge to successfully incorporate square hole cutting into your woodworking repertoire.
1. Can I use a square hole drill bit in a regular handheld drill?
No, it is highly discouraged and typically impossible. A standard handheld drill cannot provide the necessary stability or the simultaneous linear force required to drive the mortising chisel. The shearing action creates significant lateral forces that can make a handheld drill dangerous to control, leading to kickback or tool breakage. Furthermore, there is no way to securely hold the non-rotating chisel sleeve in a standard drill chuck. These bits are designed for use in a drill press with a mortising attachment or a dedicated mortise machine.
2. What is the main difference between a Square Hole Drill Bit and a Square Hole Saw?
This is a crucial distinction. A Square Hole Drill Bit is a sophisticated two-part system consisting of an inner auger bit and an outer mortising chisel. It works by drilling and then shearing to create a clean, deep, and precise hole suitable for fine woodworking joinery. A Square Hole Saw is a single, toothed blade that functions like a cookie cutter, grinding and abrading its way through the material. It is only suitable for creating rough, through-holes in thin materials and is not appropriate for creating clean, structural mortises.
3. My square hole has rough, torn edges. What am I doing wrong?
Rough edges are typically caused by one or more of the following issues:
I. Introduction: Solving the "Impossible" Task The phrase "fitting a square peg into a round hole" is a universal symbol...
READ MOREMetalworking has always been a cornerstone of industrial development, shaping everything from automotive components to a...
READ MORE1. What Are Waterpump Pliers? – The Flexible “All-Rounder” Tool In modern industrial manufacturing and daily maintenance...
READ MORESelecting the appropriate industrial cutting tools is a critical decision that directly impacts manufacturing efficiency...
READ MORE+86-573-84611229
+86-573-84611518
NO.35 Yucao Road, Ganyao Town, Jiashan City, Zhejiang Province, China
