Understanding the Single Flute Auger Bit: A Specialist in Wood Boring
The single flute auger bit is a fundamental tool in the woodworker's and tradesperson's arsenal, distinguished by its unique spiral design featuring a single cutting edge or "flute" that winds around the central shank. This design is not merely aesthetic; it serves a critical functional purpose. The primary role of the single flute is to efficiently evacuate wood chips and shavings from the hole being drilled. As the bit rotates and cuts into the material, the single, deep flute acts like a conveyor, pulling the waste material up and out of the borehole. This continuous clearing action prevents clogging, reduces friction and heat buildup, and allows for smoother, faster, and deeper drilling with less physical effort required from the user. Unlike multi-flute bits designed for speed in softer materials or cleaner finishes, the single flute design prioritizes chip removal and power, making it exceptionally well-suited for demanding, deep-hole boring tasks in various wood types.
Historically, auger bits have evolved from simple spoon bits and T-augers used with hand braces. The introduction of the single spiral design marked a significant advancement in drilling technology. Modern manufacturing techniques and materials, such as high-carbon steel and advanced heat treatments, have further refined their durability and performance. The single flute auger bit for deep wood boring remains the go-to choice for applications where hole depth and clean waste removal are paramount. Its design is a testament to solving a fundamental mechanical challenge: how to remove material efficiently from a deep, confined space. For professionals and serious hobbyists engaged in timber framing, log building, or installing large-diameter plumbing and electrical conduits through studs, understanding this tool's mechanics is the first step toward mastering its application.
Key Applications and Ideal Use Cases
The single flute auger bit is not a general-purpose drill bit; it is a specialist tool engineered for specific, often challenging, scenarios. Its performance shines in contexts where other bits may stall, overheat, or become jammed.
Primary Industries and Professional Uses
In professional settings, the reliability and efficiency of a single flute auger bit can significantly impact workflow and project quality.
- Timber Framing and Log Construction: This is perhaps the most classic application. Craftsmen use these bits to bore large-diameter, deep holes for traditional joinery like mortise and tenon joints, or to create holes for drawbore pegs and structural bolts. The bit's ability to drill deep into hardwoods like oak or dense softwoods like Douglas fir without binding is invaluable.
- Electrical and Plumbing Contracting: When running cables or pipes through wall plates, sill plates, and floor joists, tradespeople need to create clean, deep holes. A high carbon steel single flute auger bit is often used in powerful right-angle drills (hole hawks) to bore through multiple stacked studs or through thick beams quickly, with its efficient chip clearance preventing the bit from getting stuck mid-hole.
- Furniture Making and Carpentry: For creating holes for table legs, bed posts, or large dowels, the single flute bit provides a clean, straight hole. Its tendency to produce a slightly rougher wall compared to a Forstner bit is often acceptable in these applications, as the joint is typically hidden or further finished.
- Agriculture and Fencing: Building fences, barns, or farm equipment often involves drilling into wet, green, or rough timber. The aggressive chip-clearing action of the single flute helps manage the gummy shavings produced by soft, wet wood.
Comparing Performance in Different Materials
While optimized for wood, the single flute auger bit's performance varies across material types. It is crucial to understand these differences to avoid tool damage and achieve the best results.
The following table contrasts the performance characteristics of a single flute auger bit across common materials:
| Material Type |
Suitability |
Performance Notes & Expected Outcome |
Key Consideration |
| Hardwood (Oak, Maple, Ash) |
Excellent |
Excels at deep, clean boring. The sharp cutting spur and single flute effectively manage hard, fibrous chips. Produces a hole with good wall integrity. |
Use slower RPM, steady feed pressure. Ensure the bit is very sharp to prevent burning the wood. |
| Softwood (Pine, Cedar, Spruce) |
Excellent to Very Good |
Drills very quickly with minimal effort. Chip evacuation is highly efficient. The main challenge can be tear-out on the exit side of the hole. |
Use a backup board to prevent tear-out. Higher RPM can be used, but be mindful of the aggressive bite. |
| Wet/Green Wood |
Very Good |
The single flute design is superior for this messy job. It helps pull long, stringy, gummy shavings out of the hole, reducing clogging. |
Bits may require frequent cleaning. Expect more resistance and potential for wandering in uneven grain. |
| Plywood or Composite Boards |
Moderate to Poor |
Can cause significant tear-out and splintering, especially on the top and bottom layers. The aggressive cutting action is not ideal for sheet goods. |
Not recommended for finish work. Use only for rough openings where tear-out doesn't matter, always with backup boards. |
| Plastic or Soft Metals |
Not Recommended |
The design will likely grab, melt, or tear the material. Chip evacuation is not designed for the swarf produced by these materials. |
Use bits specifically designed for plastic (e.g., lip-and-spur) or metal (twist drills). |
This comparison underscores that the true domain of the single flute auger is solid, natural wood. For tasks like how to choose a single flute auger bit for timber framing, the focus should be on bit length, diameter, and steel quality suited for hardwoods, rather than expecting versatility across dissimilar materials.
Anatomy and Technical Specifications
To select and use a single flute auger bit effectively, one must understand its components and the technical details that define its capability.
Detailed Component Breakdown
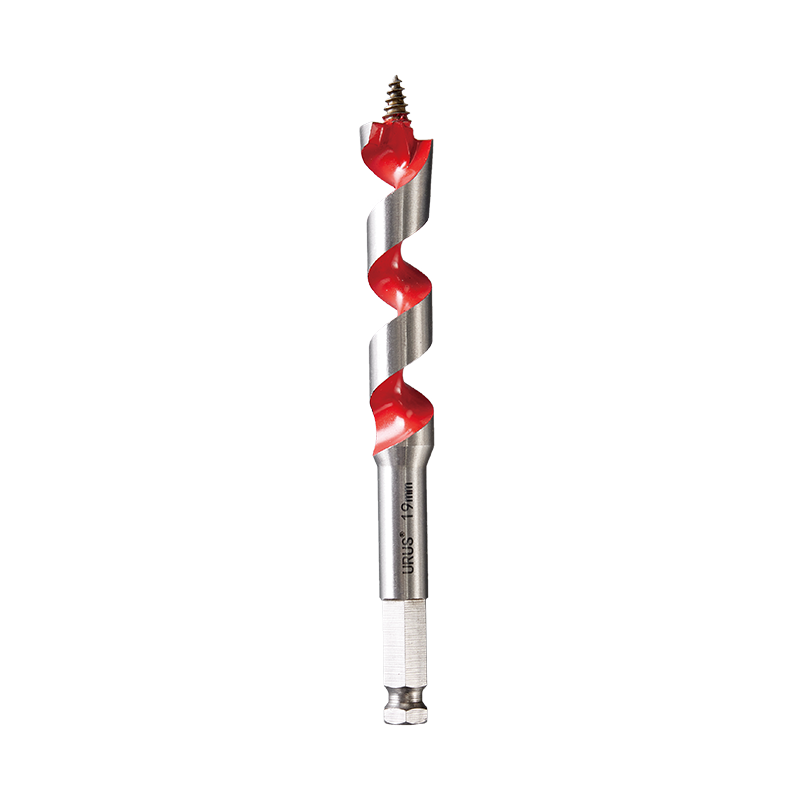
Each part of the bit plays a specific role in the cutting and clearing process:
- Screw Point (or Lead Screw): This is the threaded tip that starts the hole. It pulls the bit into the wood with minimal pressure from the user, ensuring the cut begins exactly on point and helps maintain a straight path.
- Cutting Spurs (or Nibs): These are the two sharp, extended points on either side of the screw point. They score the circumference of the hole before the cutting lips engage, resulting in a clean, sharp-edged hole with minimal tear-out.
- Cutting Lips: Located just behind the spurs, these are the primary cutting edges. They are responsible for shearing the wood fibers and creating the shavings. Their angle and sharpness are critical for efficient cutting.
- Flute: The single, deep, spiral groove that runs the length of the bit body. This is the channel that carries the cut chips upward and out of the hole. Its depth, pitch, and polish determine its chip-clearing efficiency.
- Shank: The end of the bit that is clamped into the drill chuck. For heavier-duty single flute augers used with hand braces or powerful drills, the shank is often hexagonal (hex) to prevent slippage under high torque, unlike the round shanks common on smaller twist drills.
- Land/Body: The solid core of the bit around which the flute is wound. A thicker body provides more strength and resistance to bending or breaking during heavy use.
Critical Specifications for Selection
When reviewing product specifications, several key factors determine if a bit is right for your job. Understanding the single flute auger bit size and length chart is essential for project planning.
- Diameter: Measured at the cutting spurs, this determines the hole size. Common diameters range from 1/4 inch (6mm) for light work to 1.5 inches (38mm) or more for heavy timber construction. Choosing the right diameter is the first step in how to choose a single flute auger bit for timber framing, as joint strength often depends on precise peg or tenon sizing.
- Usable Length: This is the length from the tip of the screw point to the beginning of the shank—the maximum depth you can drill in a single pass. Lengths can vary from 6 inches (150mm) for standard tasks to "electrician's length" bits of 18 inches (450mm) or more for drilling through wall cavities.
- Shank Type: As mentioned, a hex shank (often 1/4-inch or 3/8-inch) is standard for power drill use, providing superior grip. Some bits designed specifically for hand braces may have a tapered square shank (Jennings pattern).
- Point Type: Most have a standard gimlet (screw) point. Some specialized bits may have a spade-point or brad-point for specific applications where a screw point might be too aggressive.
- Material and Finish: Look for bits made from high carbon steel single flute auger bit or alloy steel. A black oxide or other protective finish helps reduce friction and resist corrosion.
Selection Guide: Matching the Bit to Your Task
Selecting the correct single flute auger bit involves more than just picking a diameter. It requires a systematic consideration of your project requirements, tools, and the material you're working with.
A Step-by-Step Decision Framework
Follow this logical process to ensure you have the right tool for the job, optimizing both results and safety.
- Define the Hole Requirements:
- What is the exact diameter needed? (Precision matters for joinery).
- What is the required depth? Is it a through-hole or a blind hole?
- What is the acceptable level of finish on the hole wall? (Rough structural vs. visible furniture joint).
- Identify the Work Material:
- Type of wood (hardwood, softwood, wet, dry).
- Thickness and whether you are drilling through knots or irregular grain.
- Consider Your Power Tool:
- Tool Type: Is it a standard drill, a high-torque right-angle drill, or a slow-speed hand brace? The tool dictates shank compatibility and available torque.
- Chuck Capacity: Ensure your chuck can accept the bit's shank size (e.g., a 1/2-inch chuck for larger hex shanks).
- Tool Power: Larger diameter and deeper holes require more torque. Using a bit that's too large for a light-duty drill can stall the motor or damage the tool.
- Evaluate Bit Specifications:
- Cross-reference your depth and diameter needs with a single flute auger bit size and length chart.
- Choose a length that exceeds your required depth to allow for chip clearance and to prevent the chuck from contacting the workpiece.
- For hardwoods and professional use, prioritize bits made from hardened high carbon steel single flute auger bit material.
Common Selection Pitfalls to Avoid
Even experienced users can make mistakes. Being aware of these common errors can save time, money, and frustration.
- Using a Dull Bit: A dull bit requires excessive force, produces poor-quality holes, generates tremendous heat (which can damage the bit's temper and the wood), and dramatically increases the risk of kickback. Sharpening or replacing dull bits is essential.
- Mismatched Speed and Feed Rate: Running the bit too fast in hardwoods can burn the wood and overheat the cutting edge. Pushing (feeding) too hard can cause the screw point to pull the bit in too violently, leading to loss of control or breakage. The general rule is slower RPM for larger diameters and harder woods.
- Ignoring the Pilot Hole for Large Diameters: For holes larger than 1 inch in diameter, especially in hardwoods, it is often wise to drill a smaller pilot hole first. This reduces the load on the bit and the tool, makes starting more accurate, and can help keep the larger bit on course.
- Choosing the Wrong Bit for Plywood: Attempting to use a single flute auger on plywood for a clean finish is one of the most frequent misapplications, leading to unacceptable tear-out. Understanding that this bit is for solid wood is key.
Operational Best Practices and Safety
Proper technique is what separates a successful, safe drilling operation from a dangerous or failed one. The aggressive cutting action of a single flute auger demands respect and careful handling.
Pre-Operation Checks and Setup
Preparation is the foundation of safety and quality. Never skip these essential steps.
- Inspect the Bit: Visually check for damage, such as a bent shank, cracked flute, or dull/missing cutting spurs. Ensure the screw point is intact and not stripped.
- Secure the Workpiece: The workpiece must be clamped firmly to a stable bench or surface. Drilling into a held piece of wood is safe; drilling into something you are holding with your hand or knee is extremely hazardous.
- Mark the Hole Accurately: Use a pencil and a square to mark the hole location clearly. For precision work, you can use an awl to create a small indentation for the screw point to seat into, preventing "walking."
- Select the Correct Speed: On variable-speed drills, start at a low to medium speed. For large diameters (over 3/4 inch), begin at the slowest speed to establish the hole, then you may increase slightly. The best drill speed for single flute auger bits is typically in the range of 500-1000 RPM for diameters around 1/2 to 1 inch, slowing down as diameter increases.
- Wear Personal Protective Equipment (PPE): Safety glasses or goggles are non-negotiable. Hearing protection is advisable for prolonged use. Do not wear loose clothing, gloves, or jewelry that could get caught in the rotating bit.
The Drilling Technique: A Procedural Guide
Follow this sequence for controlled, effective drilling, particularly for a single flute auger bit for deep wood boring.
- Position and Align: Hold the drill with both hands, positioning it perpendicular (or at the desired angle) to the workpiece surface. Brace your body stance to resist torque.
- Start the Hole: Place the screw point on your mark. Start the drill at a slow speed and apply light, steady pressure. Let the screw point draw the bit into the wood. Do not force it.
- Engage and Maintain Feed Pressure: Once the spurs and cutting lips engage, maintain a consistent, moderate forward pressure. The sound of the cut and the flow of chips are your guides. A smooth, steady sound and continuous chip flow indicate good technique.
- Clear Chips in Deep Holes: For holes deeper than the bit's flute length, you will need to periodically withdraw the bit partially while it is still spinning to clear the packed chips from the flute. This is critical to prevent binding.
- Exiting the Hole: As the screw point breaks through the back side of the workpiece, reduce feed pressure significantly. Be prepared for a slight increase in speed and potential for minor tear-out. Using a sacrificial backup board is the best practice to ensure a clean exit.
- Withdrawal: Keep the drill running and slowly withdraw the bit from the hole. This helps clear any remaining debris.
Understanding the best drill speed for single flute auger bits and matching it with appropriate feed pressure is the core of operational mastery. If the drill labors or smokes, you are feeding too fast or the speed is too low. If the bit produces dust instead of chips, your feed pressure is too light or the speed is too high.
Essential Maintenance for Longevity
A well-maintained bit is a safe and effective bit. Proper care extends its life significantly.
- Cleaning: After each use, remove all wood resin and pitch from the flute and cutting edges using a stiff brush. Solvent or a dedicated tool cleaner can be used for stubborn residue.
- Sharpening: Learn to sharpen the cutting lips and spurs using a small, fine file or a specialized auger bit file. Maintain the original angles. Sharpening the screw point is delicate but sometimes necessary.
- Storage: Store bits in a dry place, preferably in a rack or case that prevents them from knocking against each other, which can damage the delicate cutting edges.
- Lubrication: For very hard or resinous woods, a light application of wax (e.g., beeswax) on the flute and body can reduce friction and prevent pitch buildup. Never use oil, as it can contaminate wood for future finishing.
Manufacturing Excellence and Quality Assurance
The performance and durability of a single flute auger bit are directly rooted in its manufacturing process. High-quality bits are the product of precision engineering, superior materials, and rigorous testing.
The Journey from Raw Steel to Finished Tool
Producing a reliable auger bit is a multi-stage process where each step adds value and ensures consistency.
- Material Selection: It begins with selecting the correct grade of steel. For durable bits, high-carbon steel or chrome-vanadium alloy steel is chosen for its optimal balance of hardness (to hold an edge) and toughness (to resist shock and breaking).
- Forging and Forming: The steel rod is heated and forged or rolled to create the basic profile, including the hex shank and the tapered body. This process aligns the metal grain for strength.
- Machining the Flute: This is a critical operation. The single, deep helical flute is milled or twisted into the body with precise geometry. The consistency of the helix angle and the depth of the flute are crucial for smooth chip flow.
- Cutting Edge Formation: The screw point is threaded, and the cutting spurs and lips are machined and ground to exact angles. The sharpness and geometry of these edges define the bit's cutting efficiency.
- Heat Treatment: This is arguably the most vital step for creating a high carbon steel single flute auger bit that lasts. The bits are hardened to a specific Rockwell hardness (typically around HRC 58-62) to create a hard, wear-resistant cutting edge, followed by tempering to reduce brittleness and provide toughness in the body and shank.
- Finishing and Coating: The bits are cleaned, polished, and often coated. A black oxide finish is common, providing mild corrosion resistance and reducing friction by retaining some lubricity.
- Quality Inspection: Each bit should undergo inspection for dimensional accuracy (diameter, length), straightness, sharpness of edges, and proper hardness. This ensures every bit that leaves the factory meets performance standards.
The Mark of a Professional Manufacturer
Established manufacturers distinguish themselves through commitment to process and quality. For instance, Zhejiang URUS Tools Co., Ltd., founded in 1995, exemplifies this approach. Their specialization in producing various drill bits and hand tools, backed by ISO9001:2015 certification and recognition as a national high-tech enterprise and municipal R&D center, highlights a focus on systematic quality management and continuous innovation. This level of institutional commitment to manufacturing excellence translates directly to product reliability. When sourcing tools, looking for manufacturers with such credentials—those with dedicated facilities (URUS's 65,000 square meter plant), optimal logistics, and a history of exporting to demanding markets like Japan, Europe, and the United States—is a strong indicator of a company's capability to produce professional-grade tools like single flute auger bits that perform consistently under job site conditions.
Advantages, Limitations, and Strategic Alternatives
No tool is perfect for every situation. A professional makes informed choices by understanding both the strengths and weaknesses of their tools.
Core Advantages of the Single Flute Design
These are the compelling reasons to choose this bit style for appropriate tasks.
- Superior Chip Evacuation: The large, single flute offers the most volume for clearing chips, making it the best choice for single flute auger bit for deep wood boring where clogging is the primary enemy.
- Reduced Friction and Heat: Efficient chip removal means chips are not being ground between the bit and the hole wall, which reduces heat generation and power consumption.
- Aggressive Cutting and Fast Feed Rate: The design allows for rapid material removal, especially in softer woods, speeding up workflow.
- Excellent for Green/Wet Wood: Handles the long, stringy shavings of wet wood better than multi-flute designs.
- Generally Stronger Construction: The single flute leaves more solid metal in the core (land) compared to a multi-flute bit of the same diameter, enhancing torsional strength.
Recognized Limitations
Awareness of these drawbacks prevents misapplication.
- Rougher Hole Finish: The aggressive cutting action and single cutting edge typically produce a hole with a slightly rougher wall compared to a double-flute auger or a Forstner bit. This is fine for structural work but not for visible joinery.
- Potential for Tear-Out: The scoring action of the spurs helps, but exit tear-out can still be an issue, especially in brittle woods or thin materials.
- Not for Sheet Goods or Cross-Grain: Performs poorly on plywood, MDF, or OSB, causing significant splintering.
- Can be Aggressive to Handle: The pulling action of the screw point requires firm control, especially at startup, to prevent the bit from "grabbing" and jerking the drill.
When to Choose a Different Bit
Knowing the alternatives ensures you always have the right tool. This decision matrix is a practical extension of how to choose a single flute auger bit for timber framing—it defines when *not* to choose it.
| If Your Primary Need Is... |
Consider This Alternative Bit Type |
Reason for the Alternative |
| A very smooth, flat-bottomed, or overlapping hole (e.g., for furniture hinges or decorative inlays). |
Forstner Bit |
Cuts a exceptionally clean, precise hole with a flat bottom and smooth sides. Ideal for fine woodworking and cabinetry. |
| Faster drilling in dry, softwood with a slightly cleaner wall than a single flute provides. |
Double Flute (Multi-Flute) Auger Bit |
Two cutting edges provide a faster, sometimes smoother cut in consistent material, though chip clearance in deep, green, or hard wood may not be as good. |
| Drilling clean holes in plywood, veneer, or other composite boards without tear-out. |
Brad-Point Drill Bit or Carbide-Tipped Specialty Bit |
Brad-point bits have a central spur and outer spurs that score the wood fibers cleanly before cutting, minimizing tear-out in sheet goods. |
| Extremely deep holes (many feet) in logs or large timbers. |
Ship Auger Bit (Extra Long, Often with a Double Flute Start) |
Ship augers are designed specifically for extreme depth, with a very long lead and often a modified flute design to handle the unique challenges of very deep boring. |
| Precision, small-diameter holes (less than 1/4 inch) in wood. |
Standard Twist Drill Bit or Brad-Point Bit |
More cost-effective and available in a wider range of small sizes. Provides sufficient chip clearance for small diameters. |
By integrating this knowledge—from the fundamental mechanics and selection guided by a single flute auger bit size and length chart, through safe operation adhering to the best drill speed for single flute auger bits, to an honest assessment of its place among other tools—you can fully leverage the unique capabilities of the single flute auger bit. This ensures it remains a reliable and powerful solution for the deep, clean wood boring challenges it was masterfully designed to conquer.
 中文简体
中文简体 English
 русский